2.4. ODBC
2.4.1. Introduction
The ODBC driver is our best effort to allow you to use quasardb with a standardized API.
We will guide you through the process of:
Installing the driver
Parameters
Adding a datasource
Using the driver or dsn with pyodbc
2.4.2. Installation
2.4.2.1. Windows
You can find on our download page a setup package specific to the odbc driver.
You can choose the folder where you want it installed and that’s it!
Caution: Using the uninstaller will automatically remove the driver and any datasource associated with it.
2.4.2.2. Linux
You can find on our download page a package for the odbc driver.
It includes an installer that adds the driver to the system, the odbc driver library as well as our quasardb client library.
2.4.3. Driver Parameters
Here is a list of the most common parameters, you can either set them in the dsn or the connection string you use.
Parameter
Description
LOGDIR
A path to the folder in which you wish our log file to be stored
URI
A cluster URI you wish to connect to
UID
The username you log in with
PWD
The password associated with the user
KEY
The cluster public key file content
DSN
The name of the datasource
DESCRIPTION
A description of this specific datasource
2.4.4. Adding a datasource
The way odbc works on windows and linux change widely, please select the tab corresponding to your operating system.
To add a datasource on windows you have two options.
Either add it programatically with odbcconf.exe, with the following commands:
odbcconf.exe CONFIGDSN "qdb_odbc_driver" "DSN=quasardb|Driver=qdb_odbc_driver|URI=qdb://127.0.0.1:2836"
It’s especially useful if you wish to connect to a secured cluster:
odbcconf.exe CONFIGDSN "qdb_odbc_driver" "DSN=quasardb|Driver=qdb_odbc_driver|URI=qdb://127.0.0.1:2836|UID=user_name|PWD=user_private_key|KEY=cluster_public_key"
You can add as many parameters as you wish in the secondary string.
Any unmentionned field will be filled with a default value.
You can find more information about odbcconf.exe on the microsoft documentation page: https://docs.microsoft.com/fr-fr/sql/odbc/odbcconf-exe?view=sql-server-ver15
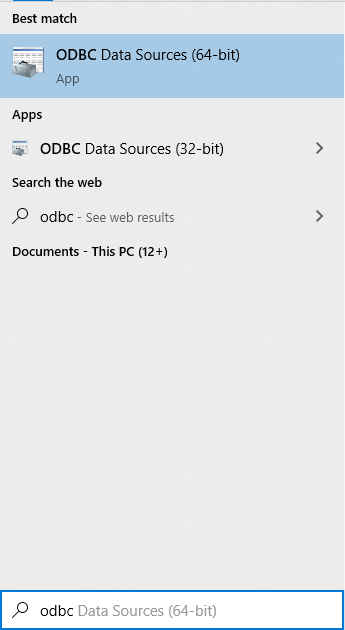
You can also add it with the windows GUI:
To do so, open the windows search, type “odbc”, you should see and open the follwing program: “ODBC Data Sources (64bit)”:
It should have opened this window:
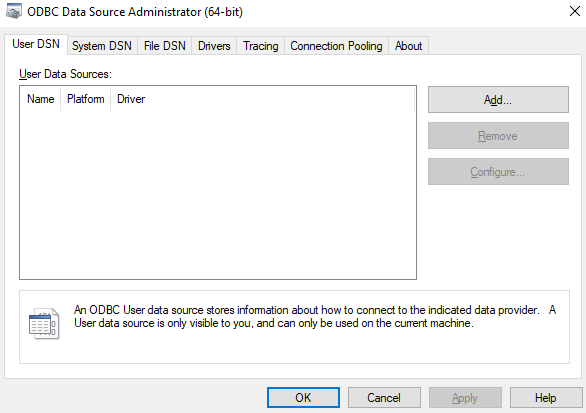
Click on the Add… button on the right side, and then Finish on the dialog box:
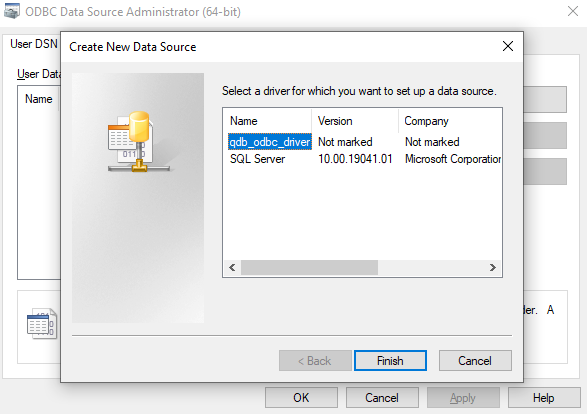
It will automatically add a default datasource.
It is not yet possible to configure it with added GUI windows.
If you wish to modify the recently created datasource, open regedit windows program.
Then open the following registry path:
Computer\HKEY_CURRENT_USER\SOFTWARE\ODBC\ODBC.INI\qdb_odbc_driver
You should find the parameters aforementioned and be able to modify them to suit your needs.
The odbc system on linux has several environment variables of interest.
ODBCSYSINI, ODBCINSTINI, ODBCSEARCH, and ODBCINI.
The first file of interest is at the path $ODBCSYSINI/$ODBCINSTINI.
If you used the installer packaged with the driver you should see something alike:
[qdb_odbc_driver]
Description=Quasardb ODBC Driver
Driver=/path/to/libqdb_odbc_driver.so
Setup=/path/to/libqdb_odbc_driver.so
APILevel=1
ConnectFunctions=YYY
DriverODBCVer=03.80
FileUsage=0
SQLLevel=1
UsageCount=1
If not, you can add it manually.
Then you will need to add a datasource.
You can add it to the system dsn source in $ODBCSYSINI/odbc.ini, or the user space in $ODBCINI.
Whether $ODBCSEARCH is set to ODBC_SYSTEM_DSN, ODBC_USER_DSN or ODBC_BOTH_DSN will give you access to the datasources in one, the other, or both.
To add the datasource you can simply copy and paste the following information.
First add the datasource name:
[ODBC Data Sources]
qdb_odbc_data_source  = QuasarDB ODBC Data Source
And then its information:
[qdb_odbc_data_source]
Driver       = qdb_odbc_driver
Description  = QuasarDB ODBC Data Source
URI          = qdb://127.0.0.1:2836
UID          =
PWD          =
KEY                  =
LogDir       = /var/log/qdb
Alternatively you can set the path to the library in the Driver and Setup field, like so:
[qdb_odbc_data_source]
Driver       = /path/to/libqdb_odbc_driver.so
Setup        = /path/to/libqdb_odbc_driver.so
Description  = QuasarDB ODBC Data Source
URI          = qdb://127.0.0.1:2836
UID          =
PWD          =
KEY                  =
LogDir       = /var/log/qdb
In this case it will use the library directly and avoid setting up the driver in odbcinst file.
You can also use the odbcinst tool to add a datasource.
For this you will need a template for the dsn.
If it’s not already provided in the package you downloaded you can copy/paste the following in a dsn.ini file:
[qdb_odbc_data_source]
Driver       = qdb_odbc_driver
Description  = QuasarDB ODBC Data Source
URI          = qdb://127.0.0.1:2836
UID          =
PWD          =
KEY                  =
LogDir       = /var/log/qdb
And then use the command:
odbcinst -i -s qdb_odbc_driver -l -n qdb_odbc_datasource -f dsn.ini
2.4.5. Using the driver or dsn with pyodbc
Pyodbc is a library commonly used in python to access an odbc driver.
In this example we will use it to display some common operations.
import pyodbc

# Connect to the driver
connection = pyodbc.connect("Driver=qdb_odbc_driver|LogDir=./|URI=qdb://127.0.0.1:2836")

# You can also connect to a dsn
# Assuming you installed a datasource named "qdb_odbc_datasource"
# connection = pyodbc.connect("DSN=qdb_odbc_datasource")

# Avoid encoding errors
connection.setencoding('utf-8')
connection.setdecoding(pyodbc.SQL_CHAR, encoding='utf-8')
connection.setdecoding(pyodbc.SQL_WCHAR, encoding='utf-8')
connection.setdecoding(pyodbc.SQL_WMETADATA, encoding='utf-8')

# The next part assume a timeseries with:
#   * 'ts' as a name
#   * values in the 2020-01-01 to 2020-01-02 range
#   * 'col' as a column with int64 values

# Query data without parameters
query = u"SELECT * FROM 'ts' IN RANGE(2020-01-01, 2020-01-02);"
cursor = connection.cursor()
cursor.execute(query)
for row in cursor.fetchall():
    print(row)

# Query data with parameters
query = u"SELECT * FROM 'ts' IN RANGE(2020-01-01, 2020-01-02) where col=?;"
cursor = connection.cursor()
cursor.execute(query, 1)
for row in cursor.fetchall():
    print(row)

# pyodbc make it possible to retrieve information about all available tables
cursor = odbc_connection.cursor()
for row in cursor.tables():
    print(row)

# Another similar call enables you to get information about the columns of a specific table
cursor = odbc_connection.cursor()
for row in cursor.columns(table='ts'):
    print(row)